Visualising Extendible Hash Tables
I’ve been digging into data structures used in databases more and more recently and I wanted to write this post explaining how they work as a way to solidify my understanding.
Hash Tables
You have a regular hash table. Everyone knows what that looks like, but just to kick off the visualisation, it’s shown below.
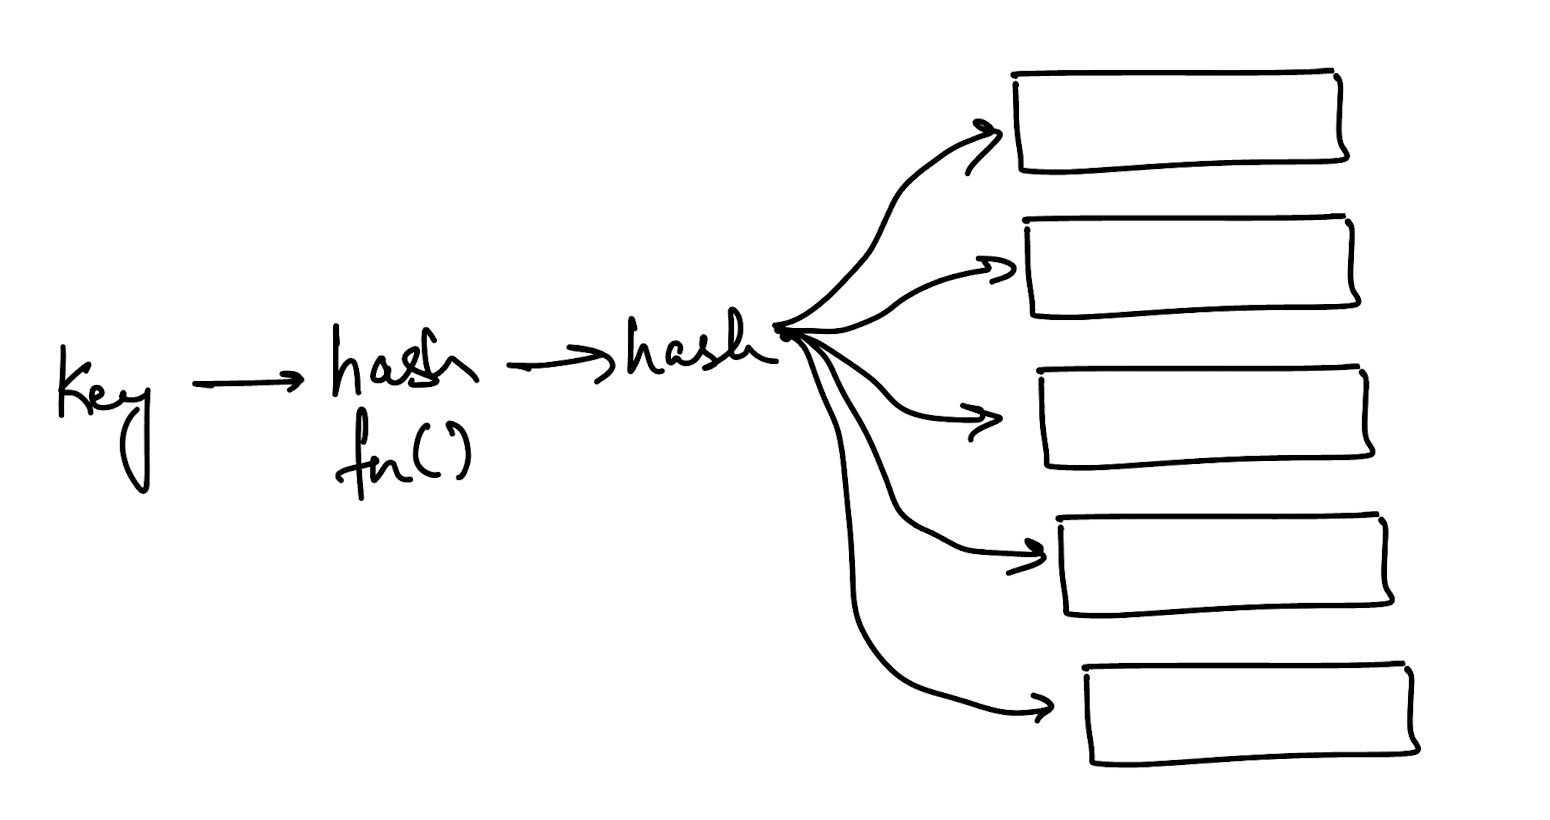
It’s pretty simple, you take a key, hash it and then get a hashed value which will lead you to some index. The index you go to based on the hash is implementation dependent - the hash could return an int, you could take a set of bits from the value etc.
You have the standard problems with this hash table of collisions occurring so you have different methods of dealing with it:
- Chain Hashing -> each slot becomes a linked list
- Linear Probing -> if a slot is taken, start linearly searching
- Cuckoo Hashing -> uses multiple hash functions
Extendible Hash Tables
The hash table variations above typically don’t do well with large volumes of data, which is what is required in databases. You need a dynamic data structure that can grow and shrink to handle changes in data and can support high throughput in a concurrent environment.
Note: Hash tables seem to be typically used to create table indexes in databases, but typically B-trees are preferred here because hash tables don’t support range queries
It’s these two things that extendible hash tables do well - when they need to grow and shrink, they do so locally (i’ll explain below) and can support fine-grained locking for concurrency.
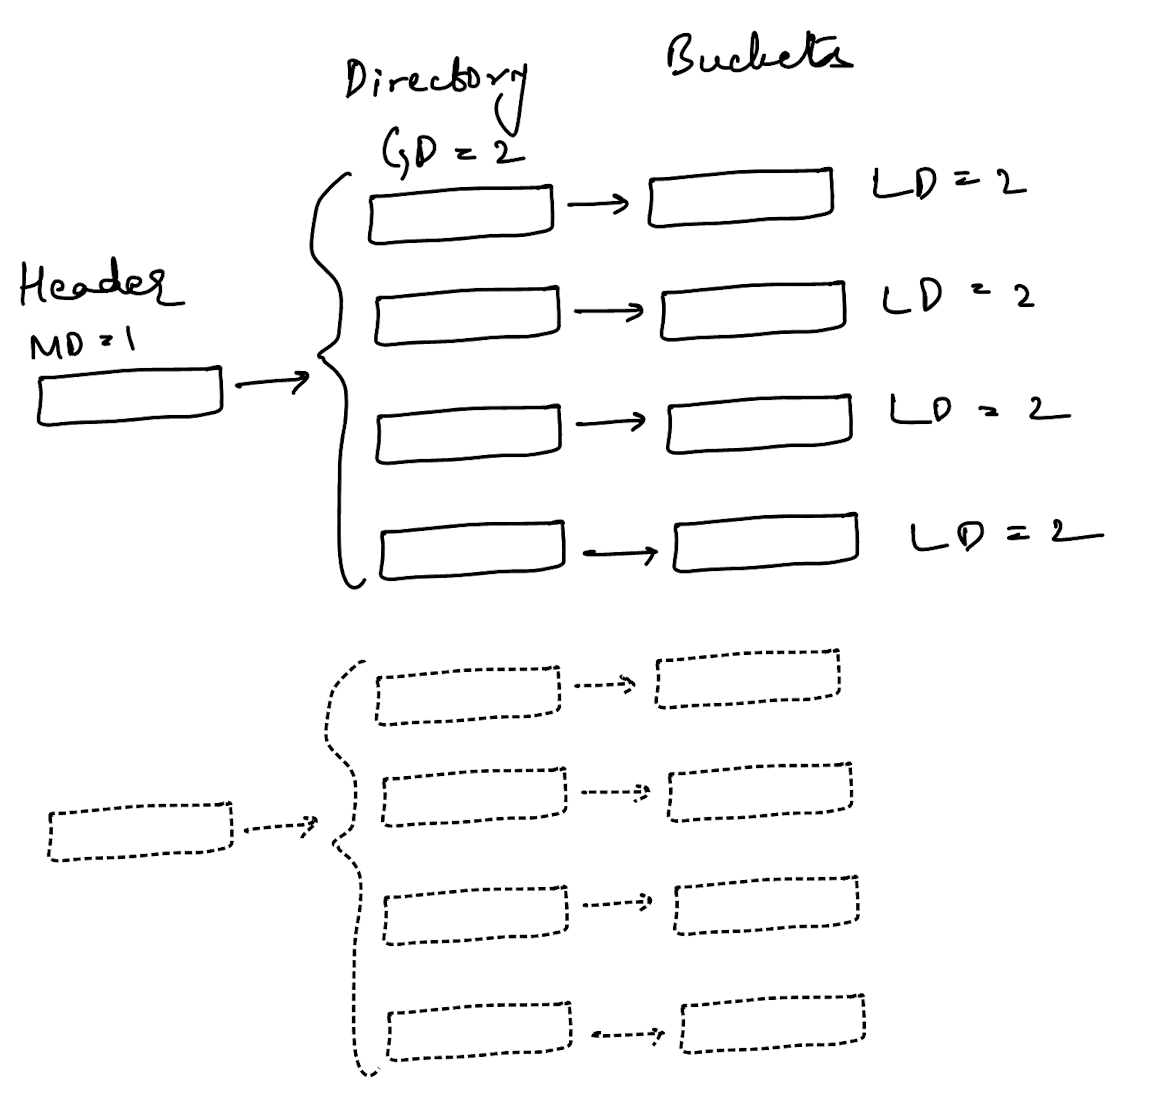
There are 3 things to keep track of in an extendible hash table - a header, a directory and a bucket. A header allows you to index into a directory and a directory allows you to index into a bucket. The image below shows an extendible hash table where each directory indexes into a unique bucket.
A header maintains a max depth, a directory maintains a global depth and a bucket maintains a local depth. The image below shows a separate header slot in dotted lines but that’s just to illustrate the difference.
State Invariants
The complexity with extendible hash tables comes with bookkeeping. A dynamic data structure that can grow and shrink on demand typically has a lot of invariants to track and programmer discipline is required to ensure they are maintained.
There were three variables in the upper image: MD (maximum depth), GD (global depth) and LD (local depth). All variants that need to be maintained center around these two variables.
- The number of slots in the header will always be
2^(max depth) - The number of slots in the directory will always be
2^(global depth). - The number of directory slots that index to a bucket will always be
2^(global depth - local depth). - The global depth of the directory must always be greater than or equal to the local depth of every bucket.
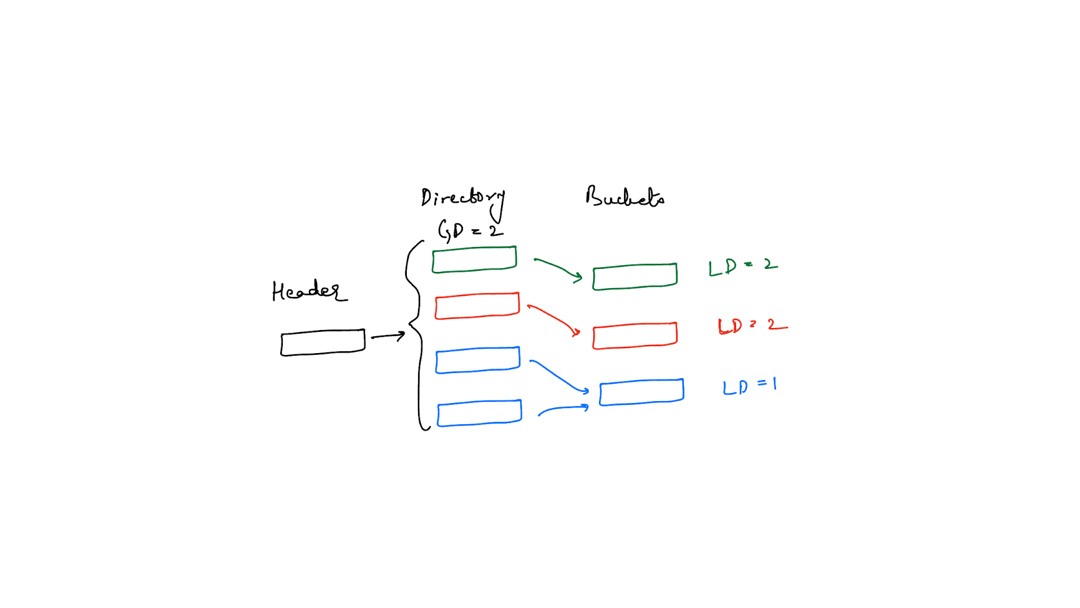
Again, it’s easier to understand this when you see an image depicting this.
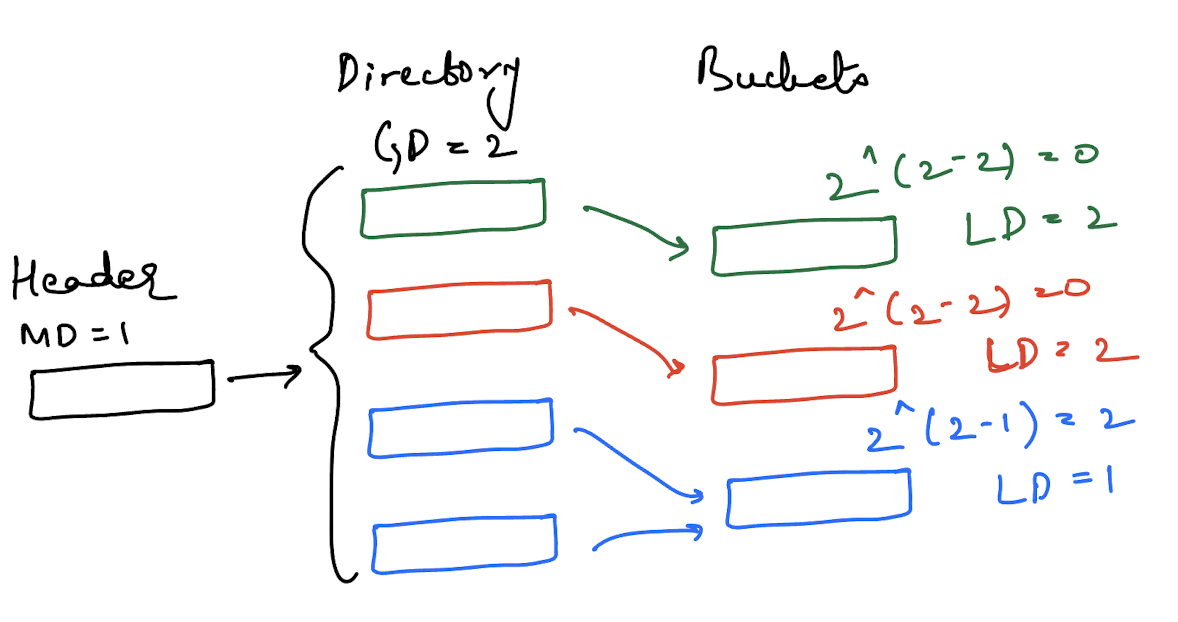
The image above has two directory slots pointing to one bucket because the global depth is 2 and the local depth of the bucket is 1.
What Does Growth And Shrinkage Look Like
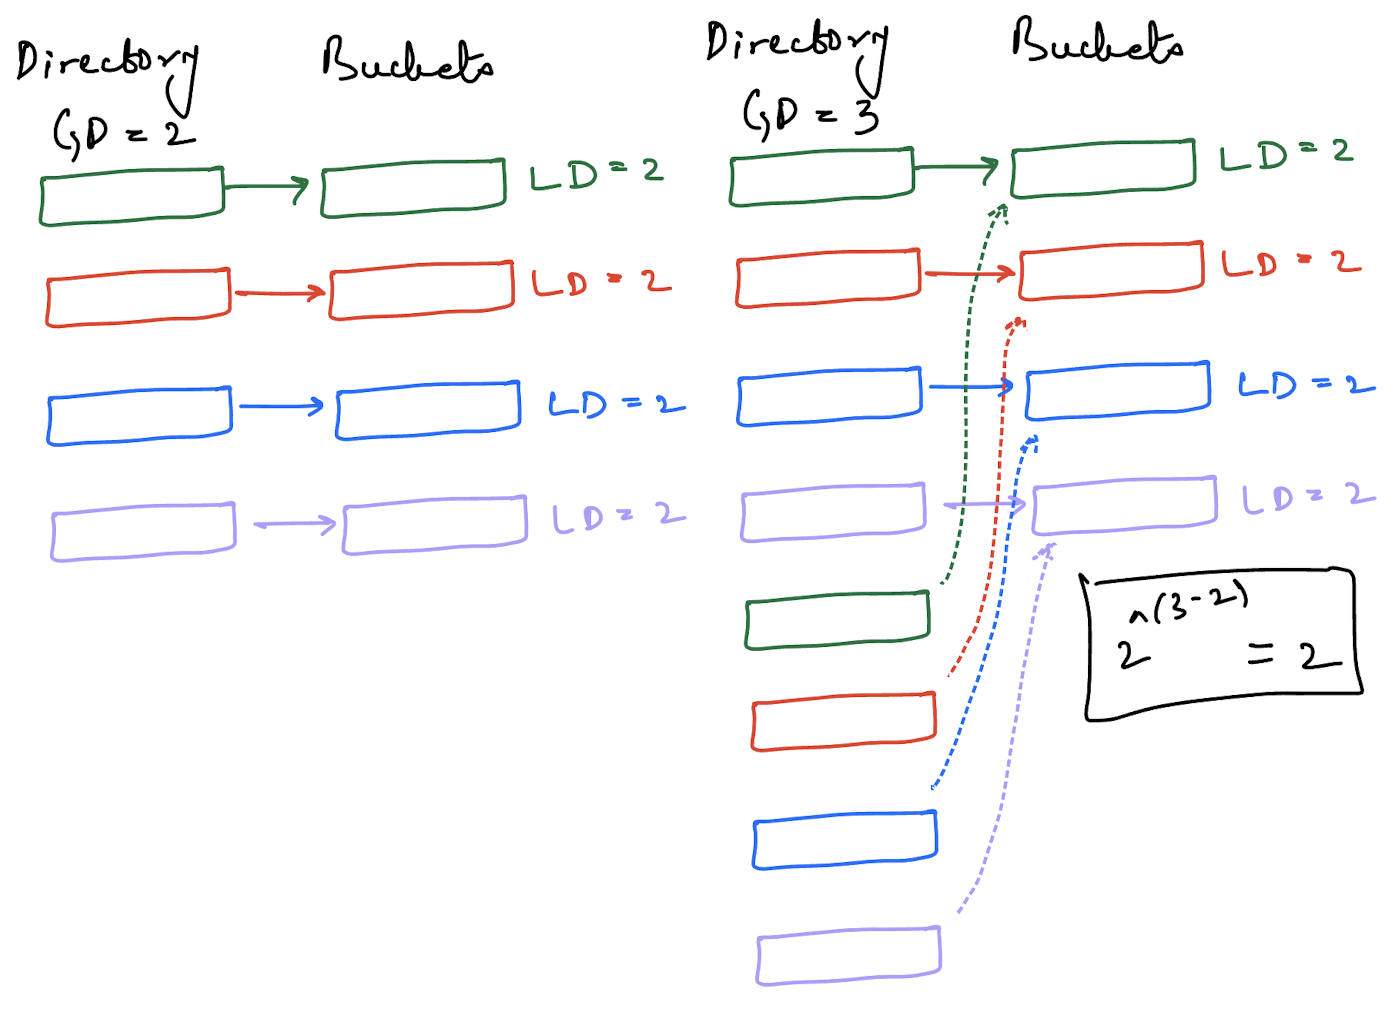
When an extendible hash table grows, it’s because of a bucket split. The condition under which a bucket splits is implementation dependent - it could be half-full or full. And when a bucket splits, it’s local depth increases by 1. So, if there was bucket with a local depth of x, after the split there will be 2 buckets with a local depth of x+1 each.
We’ll split the hash table from the previous image to illustrate
The invariants are still maintained, specifically the third one. The number of directory slots indexing to a specific bucket are 2^(global depth - local depth).
We split a bucket and we have 4 directory slots pointing to an individual bucket each. Now, what happens if a bucket overflows and needs to split again? We do what a regular hash table does and grow the directory by a power of 2. But, this is where data structures like this get tricky - we have to ensure our invariants are maintained across state transitions.
To grow the directory, we need to increment the global depth to ensure that invariant number 2 is maintained. That’s easy enough, if the global depth now is 2^2 = 4, it becomes 2^3 = 8.
Next, we need to ensure the bucket invariant(invariant number 3) is maintained, which is slightly tricker. For this, I’m going to take a shortcut and explain why the shortcut works later. The shortcut is that I’m going to mirror the pre-existing half of the directory after growing it.
Okay, now we have growth out of the way, it’s far easier to understand shrinkage because it’s the mirror opposite. A bucket can merge with another bucket in which case the local depth of the bucket decreases and a directory can shrink (halve in size) as long as all the invariants are maintained.
Traversing (Indexing) Into The Hash Table
This section is about how to actually traverse the extendible hash table and we’ll also figure out what the use case for the global depth and the local depth is beyond just keeping track of the number of available slots.
You have some key which you hash with some uniformly distributed hash function and the resulting hash can be represented in 32 bits. You take the max depth number of most significant bits to find the correct directory from the header and the global depth number of least significant bits to find the correct bucket from the directory.
Here’s an illustration.
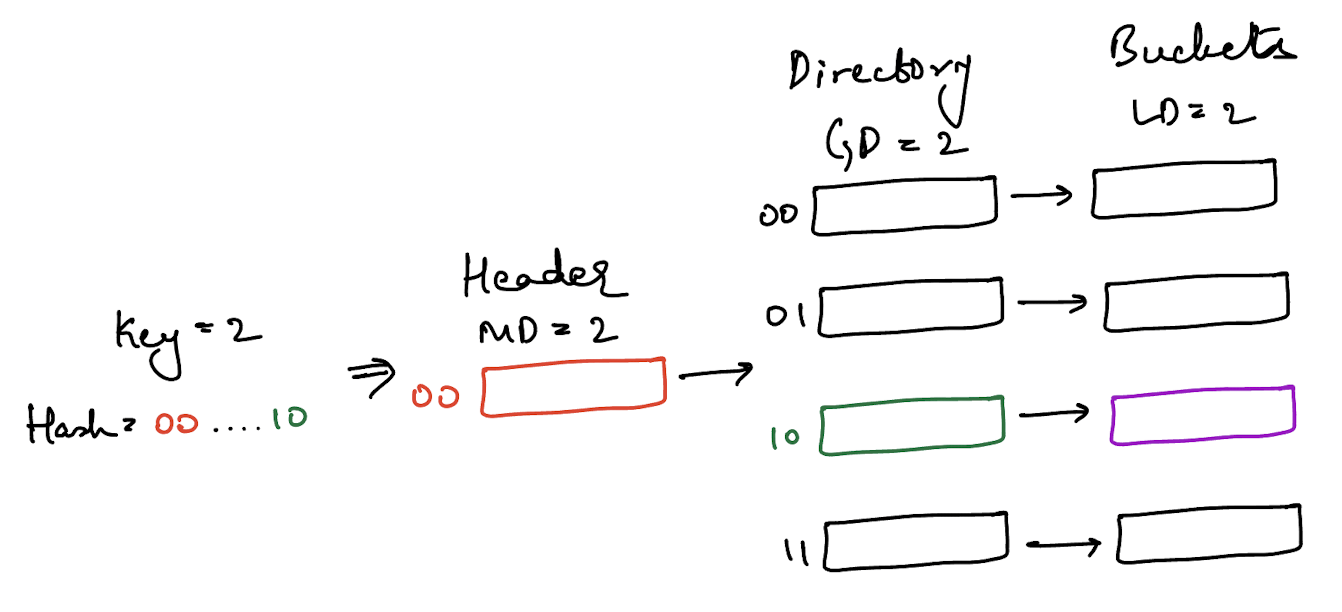
The example above assumes that the hash of the key 2 is the value 2 itself and in binary this would be 00….10 with 00 being the two MSB and 10 being the two LSB. We use the two MSB and the two LSB because that’s the max depth of the header and the global depth of the directory.
Now, if the directory grows and the global depth increases, the great thing is that none of the values have to be re-shuffled. Again, it’s easier to see why.
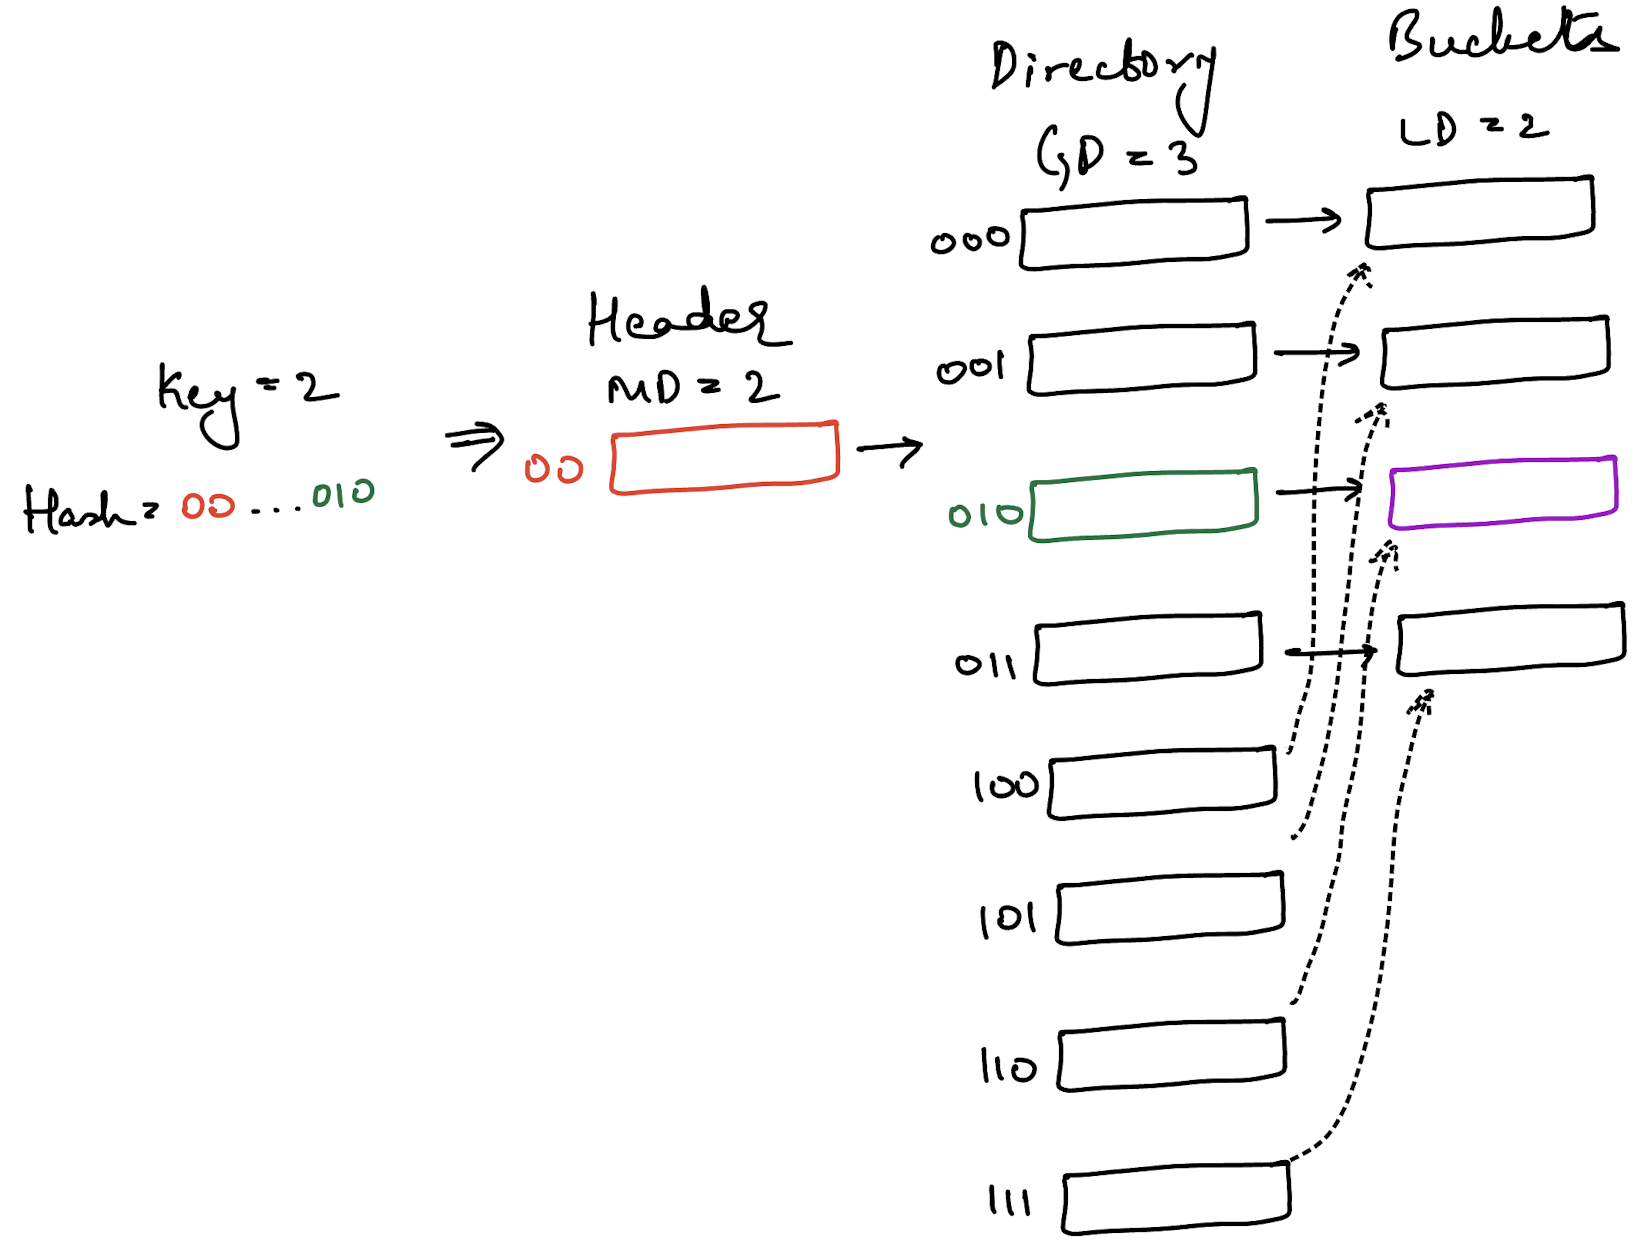
The number of bits we consider for the header is still 2 because the header depth hasn’t changed. The number of bits we consider for the directory is now 3 because it has increased by 1. But, given a sufficiently large number of bits (like 32), the bits at the end will still lead to index 2 (010) for the number 2.
Bit Resolution
Earlier I mentioned that when a directory is doubled, an easy trick is to mirror the first half of the directory.
The reason that works is shown in the image above. When the global depth of a directory is 3, you use the 3 LSB of a hash to determine which directory slot to look at.
With the key 2, the 3 LSB are 010 which leads to bucket 10 (the bucket has a local depth of 2). Now, with a key 6, who has is 000....110, this would lead you to directory slot 110 which would also lead you to bucket 10.
The directory, with a depth of 3, is using 3 bits of resolution. All the buckets, with local depths of 2, are using 2 bits of resolution. So, any hashes having the same 2 LSB but differing in the 3rd LSB will start off in different directory slots but end up in the same bucket.
This is why the trick of mirroring the directory works. In the image, every new directory slot differs from its mirror image bucket only in the 3rd LSB, so it will always point to the same bucket as its mirror image.
The directory slots 2(010) and 6(110) will point to the same bucket with a local depth of 2 bits because their last 2 bits are identical.
Concurrent Traversing (Indexing)
Now, this is the real meat of data structures like extendible hash tables. How do you enable multiple threads (both reader sand writers) to traverse a data structure like this concurrently?
There’s a technique called latch crabbing which the animation below illustrates. The basic idea is that your threads move across the data structure like a crab - they hook onto one component (the header or the directory) and then try to hook onto the second component (directory or bucket) without letting go of the first component. Only after they have successfully hooked onto the second component, do they let go of the first.
The animation below shows two threads (one reader, one writer) walking down the table using latch crabbing. The reader fails because the writer acquires an exclusive lock first.
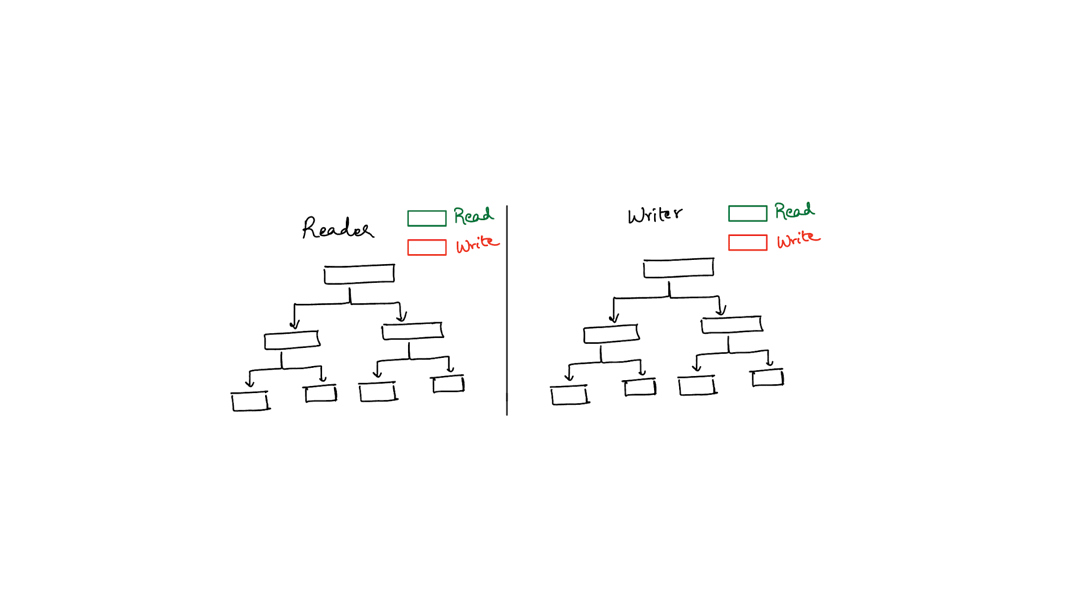
Typically, latch crabbing works by allowing each thread to acquire a shared latch on a component until the thread absolutely requires an exclusive latch on some component. This is necessitated by a write into a bucket for hash tables. However, the tricky situation is what to do when a thread wants to acquire an exclusive latch on some component but another thread already has a shared lock on that component.
You saw the situation in the animation above where the read thread wanted to acquire a read latch on a bucket but the write thread acquired the write latch first.
There’s two ways to address this - either you give preference to readers or to writers.
Writer Preference
Assume that you wanted to give writer threads first preference because a write is a more expensive operation and it’s easier for readers to start over and traverse the data structure. In this case, you would write code like the following for the reader thread and writer thread respectively.
auto read_thread(int key, int value) -> void {
  std::shared_lock<std::shared_mutex> header_lock(this->header_mutex_, std::defer_lock);
  if (!header_lock.try_lock()) {
    return read_thread(key, value);
  }
  //  some logic
  //  ......

  std::shared_lock<std::shared_mutex> directory_lock(this->directory_mutex_, std::defer_lock);
  if (!directory_lock.try_lock()) {
    header_lock.unlock();
    return read_thread(key, value);
  }
  //  some logic
  //  ......

  std::unique_lock<std::shared_mutex> bucket_lock(this->bucket_mutex_, std::defer_lock);
  if (!bucket_lock.try_lock()) {
    directory_lock.unlock();
    header_lock.unlock();
    return read_thread(key, value);
  }
}

auto write_thread(int key, int value) -> void {
  std::shared_lock<std::shared_mutex> header_lock(this->header_mutex_);
  //  some logic
  //  ......

  std::shared_lock<std::shared_mutex> directory_lock(this->directory_mutex_);
  header_lock.unlock();
  //  some logic
  //  ......

  std::unique_lock<std::shared_mutex> bucket_lock(this->bucket_mutex_);
  //  some logic
  if (no_directory_change_required) {
    directory_lock.unlock();
    //  write to bucket
    return;
  }
}
At each point where the next lock cannot be acquired in shared mode, the reader thread gives up existing locks and restarts the read operation (to reduce lock contention). When a write thread cannot acquire a lock, the scheduler puts the thread to sleep. Once the mutex is available, the thread wakes up and acquires the mutex (there are a lot of details I’m glossing over here).
Concurrent Modification And Deadlocking
Now, the code snippet above doesn’t illustrate what happens if a directory needs to change. Assume a bucket needs to split and the directory needs to grow to accomodate that.
The reader thread stays the same but let’s add some logic to the writer thread.
auto write_thread(int key, int value) -> void {
  std::shared_lock<std::shared_mutex> header_lock(this->header_mutex_);
  //  some logic
  //  ......

  std::shared_lock<std::shared_mutex> directory_lock(this->directory_mutex_);
  header_lock.unlock();
  //  some logic
  //  ......

  std::unique_lock<std::shared_mutex> bucket_lock(this->bucket_mutex_);
  //  some logic
  if (no_directory_change_required) {
    directory_lock.unlock();
    //  write to bucket
    return;
  }

  //  directory change required
  directory_lock.unlock();
  //  modify and write to bucket
  return;
}
This is a pretty simple logic extension but there’s a nasty bug hiding in here. Imagine the following series of events.
+--------------------------------------------------+
| Deadlock Illustration                            |
+-------------------------+------------------------+
| Thread 1 (Read)         | Thread 2 (Write)       |
+-------------------------+------------------------+
| header.shared_lock()    |                        |
|                         | header.shared_lock()   |
|                         |                        |
|                         | directory.shared_lock()|
|                         |                        |
|                         | bucket.unique_lock()   |
|                         |                        |
|                         | directory.unlock()     |
| directory.shared_lock() |                        |
|                         |                        |
| *waiting for bucket*    | *waiting for dir lock* |
+-------------------------+------------------------+
The write thread acquires a shared lock on the directory first and then immediately after acquires a unique lock on the bucket. But, once it realises modifications need to be made to the directory, it needs to give up the shared lock before acquiring the unique lock. However, in the time span between giving up the shared lock and acquiring the unique lock, the read thread acquires the shared lock.
Now, the read thread is waiting to acquire a shared lock on the bucket, which it can’t because the write thread has a unique lock on it and the write thread is waiting to acquire a unique lock on the directory, which it can’t because the read thread has a shared lock on it.
The problem is that the code didn’t follow lock ordering, which says that locks are relinquished in the reverse order of acquisition
What actually needs to be done is the following
auto write_thread(int key, int value) -> void {
  std::shared_lock<std::shared_mutex> header_lock(this->header_mutex_);
  //  some logic
  //  ......

  std::shared_lock<std::shared_mutex> directory_lock(this->directory_mutex_);
  header_lock.unlock();
  //  some logic
  //  ......

  std::unique_lock<std::shared_mutex> bucket_lock(this->bucket_mutex_);
  //  some logic
  if (no_directory_change_required) {
    directory_lock.unlock();
    //  write to bucket
    return;
  }

  //  directory change required
  //  release the locks -------- (1)
  bucket_lock.unlock()
  directory_lock.unlock();

  //  re-acquire the locks ------- (2)
  std::unique_lock<std::shared_mutex> directory_unique_lock(this->directory_mutex_);
  std::unique_lock<std::shared_mutex> bucket_lock(this->bucket_mutex_);

  if (no_directory_change_required) { //  --------- (3)
    directory_lock.unlock();
    //  write to bucket
    return;
  }

  //  modify and write to bucket
  return;
}
Here, there are 3 important things to look at:
- the locks are released in reverse order of acquisition (bucket then directory)
- the locks are re-acquired in the order of acquisition (directory then bucket)
- the condition is re-checked
The third condition is important because the data structure could potentially have changed from under you in the time it took you to release and re-acquire the locks.
The reason for all this complexity is because there is no atomic way to upgrade a read lock to a write lock in C++ (in fact, I’m not sure what it would even mean to upgrade a lock atomically while doing latch crabbing or how much it would necessarily help).
Note: Boost does have a way to upgrade a lock, see here. But, that still wouldn’t completely solve the problem because a lock can’t be ugpraded in the presence of a shared lock anyway. It would, however, simplify things slightly.
Atomically Upgrading A Lock
This was an interesting rabbit hole I jumped down. I’m still not quite clear what it means to atomically upgrade a lock. I’ve seen one implementation here which involves upgrading a mutex by draining all current readers by preventing any new read acquisitions.
There was also a pretty interesting Reddit thread about upgrading a mutex which got some interesting comments.
References
These are some useful references