Automating Uploading An Android App Bundle To The Play Store
Introduction
This article is going to explain to you how to automate uploading an Android App Bundle (.aab file) to the Play Store’s beta track using Android Studio and AWS as a cloud infrastructure provider. Once the app bundle is uploaded, a Slack notification is going to be triggered.
The reasons doing this is a valuable use of your time are obvious. Laziness, observability and creating a mentality of process over people.
Resources
Here are the resources we are going to be using for this tutorial:
- Android Studio
- AWS CodeBuild
- AWS Lambda
- S3
- Slack
High Level Overview
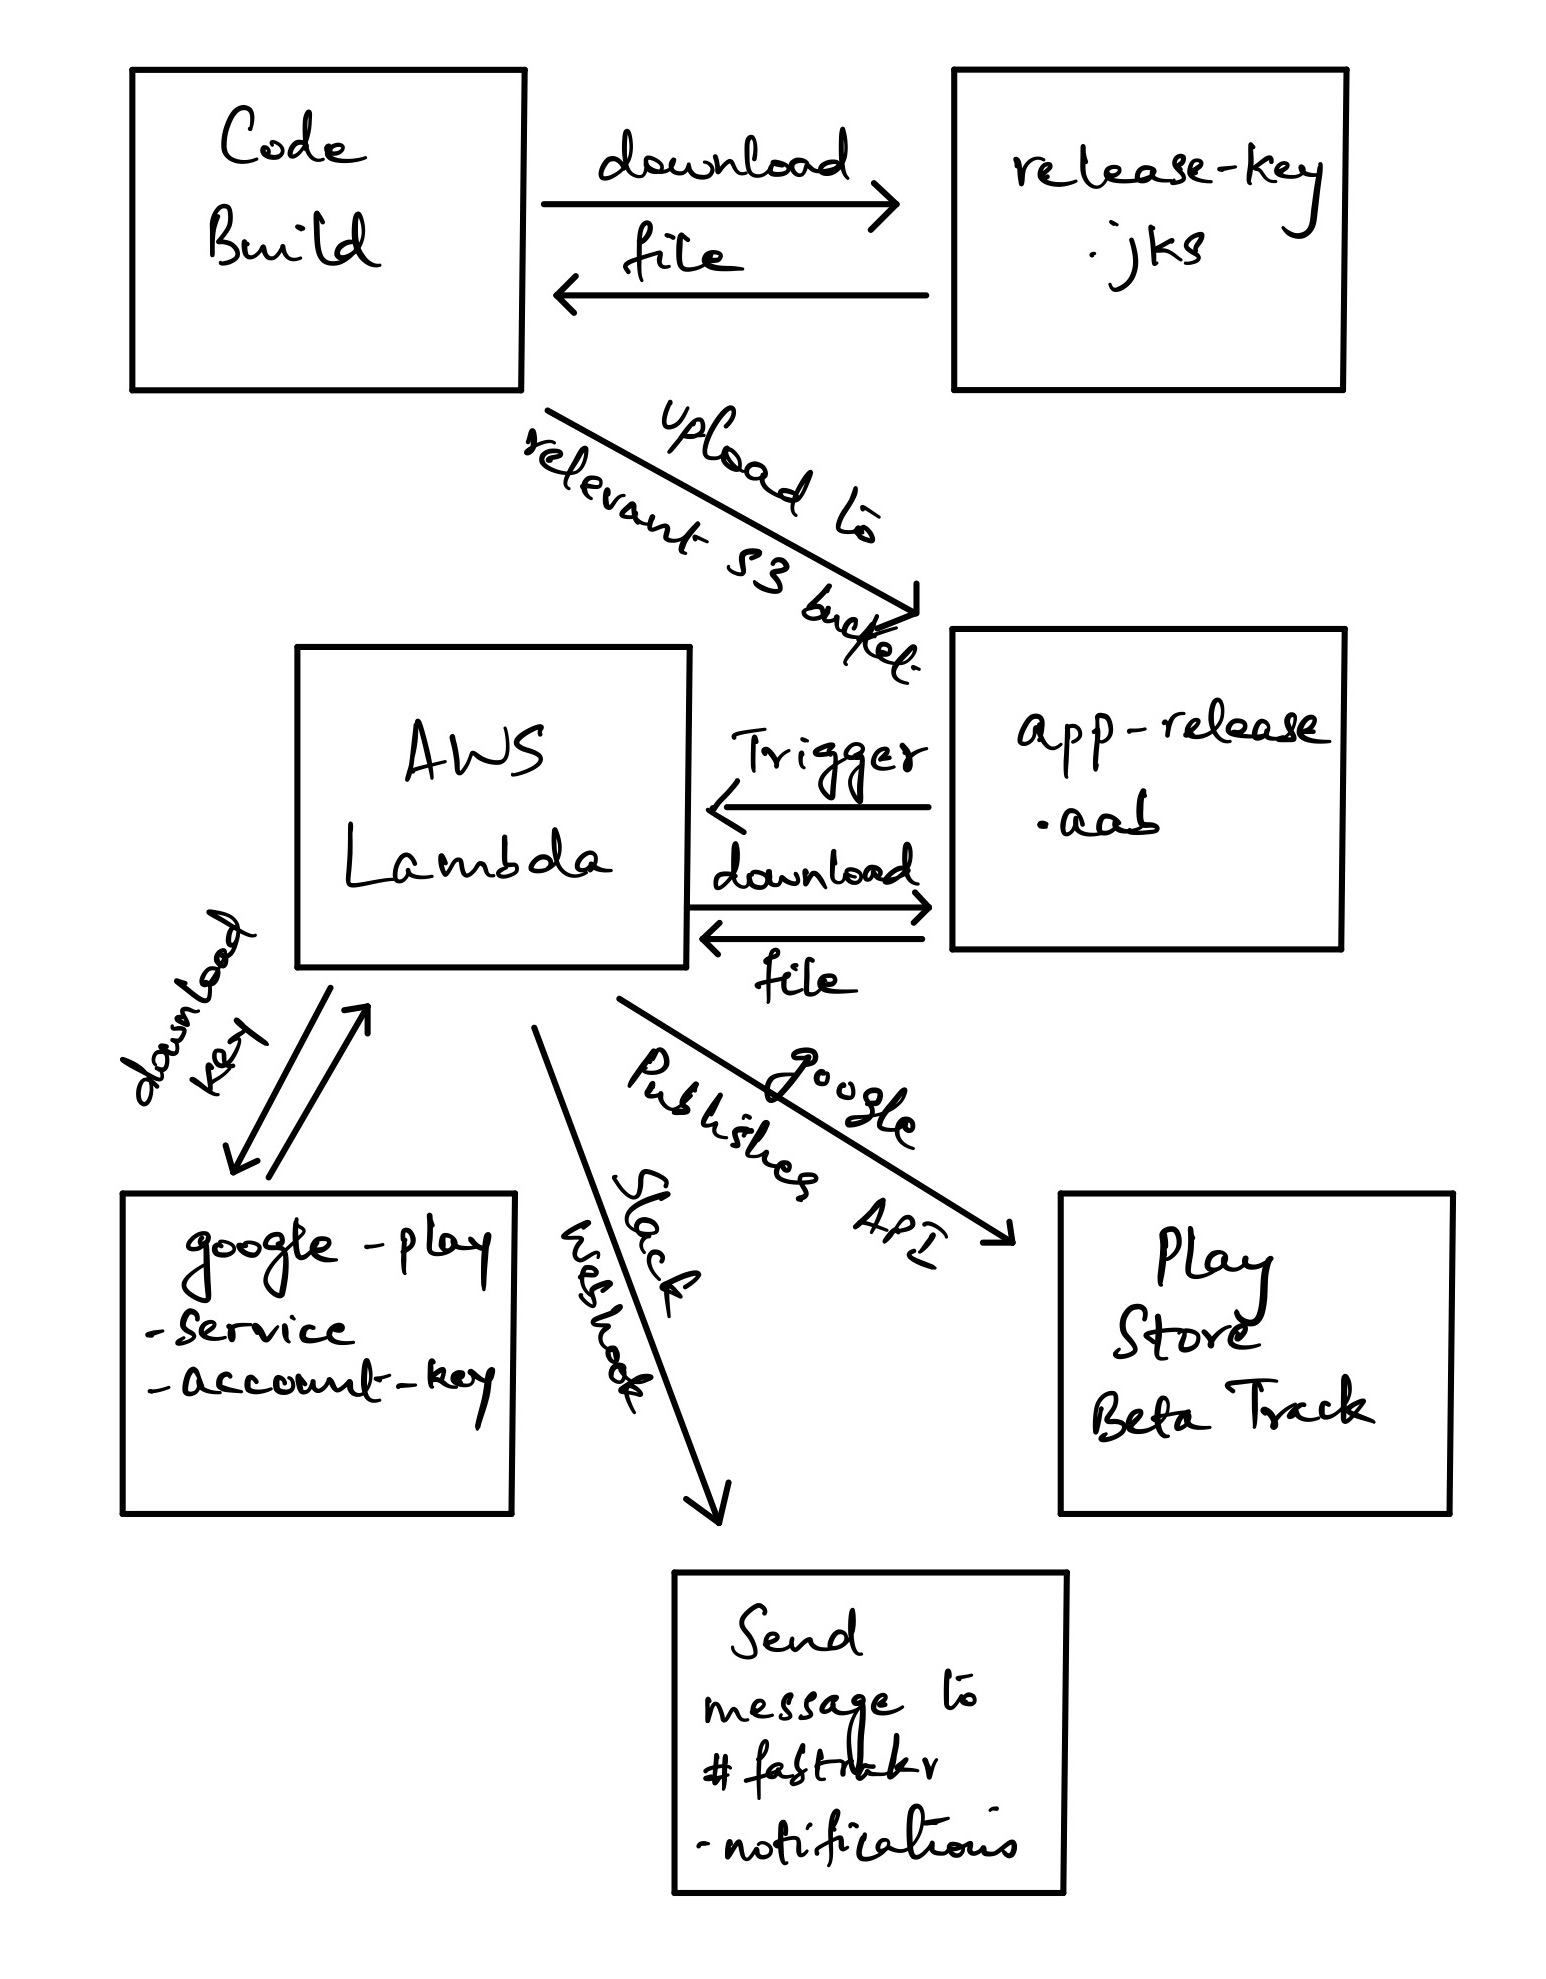
The above image shows you a general overview of how the whole thing is going to be structured.
Essentially, there needs to be a Code Pipeline set up on AWS for your Android repository. This Code Pipeline will have Code Build as one of its stages.
Pushing to the master branch of your Android app repository is going to trigger Code Build. The Code Build project will sign the Android app from the command line and upload the artifact to an S3 bucket.
Uploading the bundle to S3 will trigger a Lambda, which will download the bundle and upload it to the Play Store using the Google Publishing API. Once it gets a 200 response, the Lambda will then trigger a Slack notification.
Google Play Service Account Key
To be able to use the Google Play Publisher API, you will need a Google Play Service Account key.
A service account is an account that can act on your behalf when servers are communicating with each other. You can read more about how Google uses OAuth2.0 for server to server communication here.
To see how to create a service account and give it access to Google Play Publisher API, look here.
Once you’ve created your service account and given it the appropriate permissions, make sure to download the service account key and keep it safely. You’ll be uploading this to an S3 bucket soon.
Signing The Android Bundle
The main thing to figure out is how to sign the Android App Bundle. Google has fairly decent documentation on it that can be found here.
I’m summarizing the links below.
Generate a private key using keytool
keytool -genkey -v -keystore my-release-key.jks -keyalg RSA -keysize 2048 -validity 10000 -alias my-alias
You can call your key whatever you want. Here, it is called my-release-key.jks. You can also choose whatever alias you want. Throughout this tutorial make sure to use the correct name & alias for your key.
Open build.gradle within your app directory in Android Studio and add the following block to it
android {
    ...
    defaultConfig { ... }
    signingConfigs {
        release {
            // You need to specify either an absolute path or include the
            // keystore file in the same directory as the build.gradle file.
            storeFile file("my-release-key.jks")
            storePassword "password"
            keyAlias "my-alias"
            keyPassword "password"
        }
    }
    buildTypes {
        release {
            signingConfig signingConfigs.release
            ...
        }
    }
}
If you changed the name of your release key to something other than the default, make sure to specify the new name. Same thing for the alias.
Your store password will be whatever password you generated when you first uploaded your app to the Play Store.
Now, when you run the command ./gradlew :app:bundleRelease from the command line in Android Studio, you’ll notice a signed App Bundle is generated.
Scrubbing Signing Information
Committing code with the signing information available as plain text in the build.gradle file is a security risk and could be an attack vector.
Google has documentation around this that can be found here.
First, create a keystore.properties file in the root of your project directory.
The contents of the file should be as below:
storePassword=myStorePassword
keyPassword=myKeyPassword
keyAlias=myKeyAlias
storeFile=myStoreFileLocation
Your store password & key password will be the password you used when you uploaded your app bundle to the App Store the first time.
Your keyAlias and storeFile will be the alias you assigned when creating your private key and the location of the private key you created respectively.
Now, we need to load this file into build.gradle. This came as a surprise initially, but Gradle actually works as a DSL. So, it makes it easier to write configuration using Gradle.
//  Load properties from keystore.properties
def keystorePropertiesFile = rootProject.file("keystore.properties")

//  Creating a new Properties() object
def keystoreProperties = new Properties()

//  If keystorePropertiesFile exists, read from that, else set from build environment
if (keystorePropertiesFile.exists()) {
    //  Loading the keystoreProperties file
    keystoreProperties.load(new FileInputStream(keystorePropertiesFile))
} else {
    //  Read all environment variables from the build environment
    keystoreProperties.setProperty("storeFile", "${System.getenv('STORE_FILE')}")
    keystoreProperties.setProperty("keyAlias", "${System.getenv('KEY_ALIAS')}")
    keystoreProperties.setProperty("keyPassword", "${System.getenv('KEY_PASSWORD')}")
    keystoreProperties.setProperty("storePassword", "${System.getenv('STORE_PASSWORD')}")
}
You’ll notice the if condition in there, don’t worry about it for now. It’s there specifically to account for Code Build later.
Once you do this, change your signingConfigs section in build.gradle to look like below
signingConfigs {
        release {
            storeFile file(keystoreProperties['storeFile'])
            keyAlias keystoreProperties['keyAlias']
            keyPassword keystoreProperties['keyPassword']
            storePassword keystoreProperties['storePassword']
        }
    }
Setting Up AWS Code Pipeline
I’m not going to go into too much detail on this one since its relatively straightforward.
Set up an AWS Code Pipeline with the following three stages:
- Source stage connected to your GitHub repository’s
masterbranch - Build stage connected to AWS Code Build
- Deploy stage which will deploy to an S3 bucket.
You can find more documentation about setting up a Code Pipeline here.
Setting Up AWS S3
First, make sure you have a Code Pipeline set up with Code Build as one of the stages. Next, set up two S3 buckets:
- A bucket to store your release key in. I’m calling this bucket
release-key.jks - A bucket in which you will store your Google Play Service Account private key. (You should have downloaded this key while creating your service account)
You will need to allow access to these buckets from your Code Build service role. Your Code Build service role would have been created when you set up your Code Pipeline.
Head over to the IAM console and find your Code Build service role and grab the ARN.
Next, use the console to get to the Permissions tab for the bucket release-key.jks and add the following policy there.
{
    "Version": "2012-10-17",
    "Statement": [
        {
            "Effect": "Allow",
            "Principal": {
                "AWS": [
                    "arn:aws:iam::123456789:role/service-role/codebuild-service-role-dummy",
                ]
            },
            "Action": "s3:GetObject",
            "Resource": "arn:aws:s3:::release-key-bucket/*"
        }
    ]
}
This policy will allow access to the S3 bucket from the machine where your CodeBuild project will execute.
You will need to replace the ARN’s mentioned above with the ARN’s for your account. Make sure to specify the correct ARN for the Code Build service role when you’re updating the policy.
You don’t need to change the permissions policy for the second bucket. We’ll add the relevant permissions to the AWS Lambda role to allow it to access the bucket.
Setting Up AWS CodeBuild
Next, create a buildspec.yml file in your project root folder.
version: 0.2

phases:
  build:
    commands:
      - aws s3api get-object --bucket release-key.jks --key release-key.jks ./releaseKey.jks
      - cp ./releaseKey.jks ${CODEBUILD_SRC_DIR}/app/releaseKey.jks
      - export STORE_FILE=releaseKey.jks
      - export KEY_ALIAS=$keyAlias
      - export KEY_PASSWORD=$keyPassword
      - export STORE_PASSWORD=$storePassword
      - ./gradlew :app:bundleRelease

artifacts:
  files:
    - app/build/outputs/bundle/release/app-release.aab
This file is pretty simple. It fetches the release key from the bucket specified and saves it into a local file on the Code Build server into the location specified.
Next, export all the variables required for the build.gradle configuration to work correctly and finally run Gradle’s release command from the command line.
Before you can run this script in Code Build, you’ll need to add the variables to the Code Build environment. To do this, first go to the AWS Code Build console and pick your build project for your Android app.
Next, select Edit > Environment like in the screenshot below

On the screen that pops up once you do this, select the Additional Configuration dropdown and there you’ll see an option to add environment variables through key value pairs.
Now when Code Build runs the buildspec.yml file it will be able to export the specified variables.
As things stand right now, when your pipeline runs, Code Build will be able to download the private key to sign and build your Android app and upload the signed bundle to an S3 bucket.
Setting Up Slack App
Observability is a hallmark of automation. You want to know when your automation runs, whether it succeeds or fails and if it fails, the reason for failure.
The way AWS typically handles observability is through CloudWatch, however I think a Slack integration serves the purpose as well.
The easiest way to integrate Slack into your automation workflows is to set up a Slack app and send a notification to that app from your automation workflow.
To learn how to set up a Slack app, view the documentation here. The process is super easy and you should have an app up and running in a few minutes. Once you’ve created the app, you will be provided with a WebHook URL you can use to call the app to post into the relevant channel. Keep track of this WebHook URL because we’ll be using this with the AWS Lambda function.
Setting Up AWS Lambda
So far, we have an Android App Bundle being signed, built and uploaded to an S3 bucket. Next, we need to figure out how to upload the bundle to the beta track on the Play Store.
The way to do this will be to set up an AWS Lambda which will be triggered when the bundle is uploaded to the S3 bucket. When this trigger occurs, the Lambda will run, download the bundle, grab the service account key and upload the bundle to the Play Store beta track.
Once you’ve created a Lambda and added a trigger to run it when a file is uploaded to the bucket, look at the code below.
"""This Python3 script is used to upload a new .aab bundle to the play store. The execution of this Python script
    occurs through an AWS Lambda which is invoked when a new file is uploaded to the relevant S3 buckets"""

import json
import boto3
import os
from urllib import request, parse
from google.oauth2 import service_account
import googleapiclient.discovery

#   Defining the scope of the authorization request
SCOPES = ['https://www.googleapis.com/auth/androidpublisher']

#   Package name for app
package_name = 'com.app.name'

#   Define the slack webhook url
slack_webhook_url = os.environ['SLACK_WEBHOOK_URL']

def send_slack_message(message):
    data = json.dumps({ 'text': message })
    post_data = data.encode('utf-8')
    req = request.Request(slack_webhook_url, data=post_data, headers={ 'Content-Type': 'application/json' })
    request.urlopen(req)

#   This is the main handler function
def lambda_handler(event, context):
    #   Create a new client S3 client and download the correct file from the bucket
    s3 = boto3.client('s3')
    s3.download_file('service-account-bucket-key', 'service-account-bucket-key.json', '/tmp/service-account-key.json')
    SERVICE_ACCOUNT_FILE = '/tmp/service-account-key.json'

    #   Download the app-release.aab file that triggered the Lambda
    bucket_name = event['Records'][0]['s3']['bucket']['name']
    file_key = event['Records'][0]['s3']['object']['key']
    s3.download_file(bucket_name, file_key, '/tmp/app-release.aab')
    APP_BUNDLE = '/tmp/app-release.aab'

    print(f"A bundle uploaded to {bucket_name} has triggered the Lambda")

    #   Create a credentials object and create a service object using the credentials object
    credentials = service_account.Credentials.from_service_account_file(
        SERVICE_ACCOUNT_FILE, scopes=SCOPES
    )
    service = googleapiclient.discovery.build('androidpublisher', 'v3', credentials=credentials, cache_discovery=False)

    #   Create an edit request using the service object and get the editId
    edit_request = service.edits().insert(body={}, packageName=package_name)
    result = edit_request.execute()
    edit_id = result['id']

    #   Create a request to upload the app bundle
    try:
        bundle_response = service.edits().bundles().upload(
            editId=edit_id,
            packageName=package_name,
            media_body=APP_BUNDLE,
            media_mime_type="application/octet-stream"
        ).execute()
    except Exception as err:
        message = f"There was an error while uploading a new version of {package_name}"
        send_slack_message(message)
        raise err

    print(f"Version code {bundle_response['versionCode']} has been uploaded")

    #   Create a track request to upload the bundle to the beta track
    track_response = service.edits().tracks().update(
        editId=edit_id,
        track='beta',
        packageName=package_name,
        body={u'releases': [{
            u'versionCodes': [str(bundle_response['versionCode'])],
            u'status': u'completed',
        }]}
    ).execute()

    print("The bundle has been committed to the beta track")

    #   Create a commit request to commit the edit to BETA track
    commit_request = service.edits().commit(
        editId=edit_id,
        packageName=package_name
    ).execute()

    print(f"Edit {commit_request['id']} has been committed")

    message = f"Version code {bundle_response['versionCode']} has been uploaded from the bucket {bucket_name}.\nEdit {commit_request['id']} has been committed"
    send_slack_message(message)

    return {
        'statusCode': 200,
        'body': json.dumps('Successfully executed the app bundle release to beta')
    }
The Lambda above will use the googleapiclient library and its discovery module to build the URL for Google Play’s Publishing API. Next, the Lambda will download the service account key from the bucket you set up earlier. You’ll have to make sure you specify the correct bucket names.
Depending on whether the upload succeeds or fails, we want a Slack message to go out. Add the Slack WebHook URL from the previous section into the environment variables for the Lambda. The function above uses Python’s os module to get access to the environment variable and post the message to Slack.
If your Lambda fails, it might happen because your Lambda does not have permissions to access the S3 bucket where the key for your Google Play service account is stored. In that case, you will see an error message indicating this. To fix this, you simply need to add the relevant permissions to your Lambda role.
Here is the policy you will need to add
{
    "Version": "2012-10-07",
    "Statement": [
        {
            "Effect": "Allow",
            "Action": [
                "s3:GetObjectVersion",
                "s3:GetBucketVersioning",
                "s3:GetBucketAcl",
                "s3:GetObject",
                "s3:GetBucketTagging",
                "s3:GetBucketLocation",
                "s3:GetObjectVersionAcl"
            ],
            "Resource": [
                "arn:aws:s3:::arn:aws:s3:::your-bucket-name-with-service-account-key"
            ]
        }
    ]
}
Replace the ARN for the bucket with the relevant one for your account and you should be good to go.
Conclusion
So, there you have it. It definitely wasn’t easy and there’s a lot of moving parts but this is an automation that will save you a lot of effort. If you’re part of a team that is frequently releasing new app updates, you don’t want to be hindered by the absence of one person whose job is to release the update.
Building this sort of automation makes your CI/CD workflow a lot smoother and more robust.